
Just when you thought there were no more braid hair styles for you to try, hold on, because we’ve got some cool new looks for you. With these step-by-step tips, you’ll be able to recreate these with ease. You’ll have braids for days!
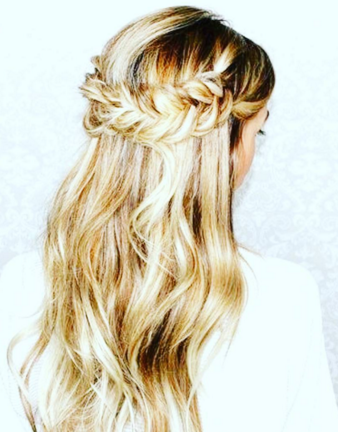
Rose Bun Braid
- Optional: add RPZL extensions to your hair for a bigger and fuller look!
- Brush your hair using a Boar Bristle Hair Brush. Make sure that your hair is smooth and tangle-free. Brush it back and away from your forehead. Brush your hair straight back so that there is no part.
- Create beach waves with R+ Co’s Rockaway Salt Spray and a 1.25 inch marcel curling iron. Pull out waves with your fingers.
- Make two individual, traditional braids above each ear about 3 inches wide.
- Braid each section halfway down–far enough so that the two braids come together to meet in the middle. Secure each braid individually with a thin elastic pony tail.
- Then, pull the braids back, to create a half ponytail. Use a pony tail to hold the two pieces together.
- Take the loose hair from the half pony and wrap the hair in a circular motion, giving a rose effect. Use hair pins to hold the rose bun into place. However, you can also take the end of a tail comb and pull little pieces out to give it a messier feel.
- Grab a 3 inch section of hair right underneath the rose and make a traditional braid. Secure with a pony tail.
- Use R + Co Outer Space Flexible Hairspray to maintain hold and keep the look in place.


Two Dutch Braids
- Optional: add in a track or two of RPZL Clip-in extensions for extra length!
- Add beach curls to your hair using a 1.25 Marcel curling iron or a 1 inch curling wand.
- After the curls are done, spray your hair with R+Co Rockaway Salt Spray and lightly scrunch it in, breaking up the waves.
- If you feel like your hair is still too fine/soft and you need a little extra “grip” at the base, sprinkle a little R+Co Death Valley Dry Shampoo at the root!
- Create two Dutch braids going from the temple area to the back of your crown and secure the ends with a tiny clear elastic or lightly tease the ends to keep the braids from unraveling (that’s what we did here).

Fishtail Crown Braid
- Optional: add RPZL extensions to your hair for a bigger and fuller look!
- Brush your hair using a Boar Bristle Hair Brush. Make sure that your hair is smooth and tangle-free. Brush it back and away from your forehead. Brush your hair straight back so that there is no part.
- Starting 2 inches back from your hairline, Dutch fishtail braid the hair by crossing the pieces under rather than over from one side to another and adding hair (much like you would a French braid) as you move down toward your ends.
- Stop Dutch braiding once you reach your ear, and start doing a regular fishtail braid until the end.
- “Pancake” the braid to expand the look of it by gently tugging at the edges of it to make it more voluminous and flat, and then pin the crown braid to the middle of your head to secure it.
- Use R + Co Outer Space Flexible Hairspray to maintain hold and keep the look in place.


Fishtail Half Up Half Down
- Optional: add RPZL extensions to your hair for a bigger and fuller look!
- Brush your hair using a Boar Bristle Hair Brush. Make sure that your hair is smooth and tangle-free. Brush it back and away from your forehead. Brush your hair straight back so that there is no part.
- Create a half ponytail. Use a throw away elastic to secure the pony (you will be cutting the elastic off at the end to achieve this look).
- Split your half ponytail into two sections.
- Begin braiding your fishtail. Use your index fingers to separate a small section of your hair from the outer edge near the elastic and cross it over to the opposite side (overlapping just like you would if you were doing a standard braid). Re-grip your hair to tighten braid, still holding onto the two sections. Repeat with a small section from the other side.
- Continue overlapping pieces from both sides of your ponytail, all the way down to your ends. Be sure to pull small sections from underneath to cross over, and try to take the same size (about a half inch) sections from each side.
- Once you’ve fishtail braided your hair down to the bottom, secure the fishtail with another elastic – preferably one that blends into your hair so it appears seamless. Then, use scissors to carefully cut out the elastic at the top of your half pony.
- Finish your fishtail by gently pulling outward on your braid with your fingers to loosen it for an effortless look.
- Iron or wave your loose hair that is not in the fishtail according to your desired look. If you want a sleeker look, iron your loose hair, finish off with R+Co’s Foil Frizz and Static Control Spray. If you want a slightly messier look, simply use a curling wand on the surrounding hair and add a texturizing spray such as R + Co’s Rockaway Salt to the loose hair to give it more texture and movement.


Dutch Braid
- Optional: add RPZL extensions to your hair for a bigger and fuller look!
- Brush your hair using a Boar Bristle Hair Brush. Make sure that your hair is smooth and tangle-free. Brush it back and away from your forehead. Brush your hair straight back so that there is no part.
- Gather a small section of hair at the top of your head (ranging from 3-5 inches wide and 1 inch thick). Try to make the section no wider than your hand. All the hair in this section should come from the same level. You don’t want to grab strands from higher up or lower down.
- Split the section you grabbed into three strands for braiding. The Dutch Braid consists of intertwining three strands of your hair so this will be the base you start from.
- Cross the right strand under the center strand.
- Cross the left strand under the center strand.
- Repeat the pattern and cross the right strand, then the left strand, under the center strand.
- Cross the right strand under the center, and pick up another small section from the right side of your head.
- Cross the left strand under the center, and pick up another small section from the left side of your head.
- Add more hair to your braid by picking up small strands every time you cross pieces under the center strand.
- Continue the Dutch Braid to the nape of your neck.
- Tie off your braid with an elastic band.
- Use R + Co Outer Space Flexible Hairspray to maintain hold and keep the look in place.

Hairstyle Trends 2016, 2017, 2018: Best Holiday & New Years Eve Looks With RPZL Extensions, Wigs
You can purchase all reviewed and mentioned items using BeautyStat.com.
Which of these braids will you try?
Let us know by commenting below (you just might win a free sample)! Make sure to follow us on our Pinterest page by clicking HERE! And don’t forget to get the latest beauty and skincare news by following us on Facebook, Twitter & Instagram @BeautyStat! #bstat
– Allycia Wilson, Managing Editor
You can follow Allycia on Instagram and Twitter @lisalacquer
For more giveaways and contests, sign up for our newsletter HERE.
If you like this post, share it with your friends and give it a LIKE on Facebook.